

Popular Posts widget is a great tool to engage your visitors by showing them what contents are trending on your website/blog. This keeps your visitors to keep an eye on the popular topics you covered and enjoy them directly from your blog's sidebar. Besides these benefits, there are few limitations of blogger's popular posts widget such that it is not so much attractive. So In this tutorial, I will guide you to make your Popular Posts widget stylish and professional-looking and customize it accordingly to your blog's template easily. So let's start the tutorial on how you can easily add a stylish popular posts widget to your blogspot blog.
Add Stylish Popular Posts Widget to Blogger Blog:
First of all, you need to add Blogger's default Popular Posts widget to your blog and using some CSS coding, modify it accordingly to your needs. So, follow the below-given steps.
Simply, Go to Blogger > Layout.

Click on Add a gadget link and Choose Popular Posts gadget from the gadgets list.

Now make following settings:
Set most viewed to Last 7 days (preferred) or you can set it according to your needs.Check image thumbnail and snippet to show thumbnail along with post summary. It will make our gadget spicier.Select no. of posts you want to show. In this example, I am selecting 6. You can show at most 10 posts. (Take a look at the picture below.)
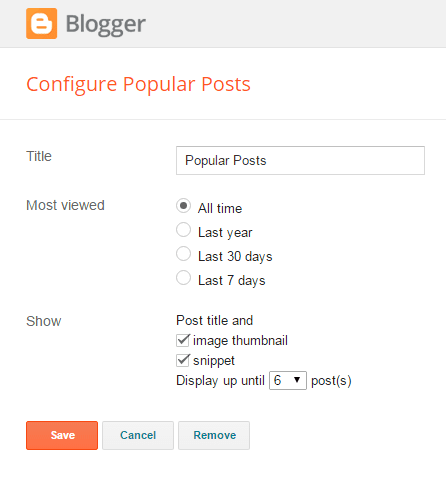
Save the widget and head on to the steps mentioned below.
Now Go to Blogger > Template.

Backup your template to prevent it from any crash.Click on Edit HTML Tab and Search </b:skin> tag. (Use Ctrl+F for quick find)Now Just above the </b:skin>, paste the below given codings.
/*--- BBeginner.Com Popular Posts --- */
.popular-posts ul{padding-left:0px;}
.popular-posts ul li {background: #FFF url(https://blogger.googleusercontent.com/img/b/R29vZ2xl/AVvXsEhmoOuo9jN24mRq3nV2sEDNrS5EKovgPKD03mJDIFnJT9yqD2bZKAv9IFd3xBdDwM1YoDPFlVlBNu2T0AsGGrIOnzuZbOYsFPoTNzqf7e4C238kg1b_GaR-vvoYhV1KJQJ6GEEfO4hkxnk/s1600/bb-bullet.gif) no-repeat scroll 5px 10px;
list-style-type: none;
margin:0 0 5px 0px;
padding:5px 5px 5px 20px !important;
border: 1px solid #ddd;
border-radius:10px;
-moz-border-radius:10px;
-webkit-border-radius:10px;
}
.popular-posts ul
li:hover {
border:1px solid #6BB5FF;
}
.popular-posts ul
li a:hover {
text-decoration:none;
}
.popular-posts .item-thumbnail img {
webkit-border-radius: 100px;
-moz-border-radius: 100px;
border-radius: 100px;
-webkit-box-shadow: 0 1px 3px rgba(0, 0, 0, .4);
-moz-box-shadow: 0 1px 3px rgba(0, 0, 0, .4);
box-shadow: 0 1px 3px rgba(0, 0, 0, .4);
}
Save your template and You're all done!
Now, take a look at your blog and see this amazing widget in action.


No comments:
Post a Comment
Your Comments Here...